Create Halloween Creepy Crack face with Gimp.
I know Halloween is over but craze never goes down. Right? So today I'm going to introduce you with an awesome Crack Face illustration. There are many tutorials for Photoshop to do this but this tutorial is specially focused on Gimp. SO here it goes:
Step 1: Open your Image in Gimp.
Step 2: Now create a new layer and name it "pattern". Then Drag and Drop the Dried Mud Pattern in that layer.
Step 3: Now in the layer window click on the eye icon near the "pattern" layer. This will set the visibility OFF. Now select "Background" layer and use free select tool to select all the skin part as shown in the figure below.
Step 4: In layer window for the "pattern" layer click the eye icon again, making it visible again. Now select "pattern" layer. In canvas window click ctrl+I and then click delete button to delete all the patter area out of the selected area as shown in the figure below(note: if you don't get transparent area after deleting the pattern then plz Go to Layers>>Transparency and click on add alpha then delete the area)
Step 5: In the Layer window there's a drop down list for Modes. In this list select Multiply mode.
Result of above step is as following:
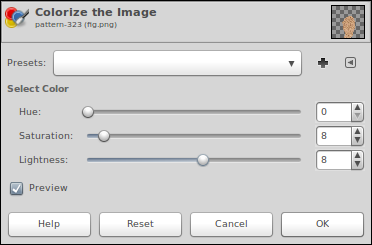
Step 5: Now press ctrl+shift+A to remove all the selections. Then choose "pattern" layer and open Colors>>Colorize.
this will open a setting window in which set the bars as shown in the figure below:
Result of above steps is s follows:
Step 6: Now last step go to Fx-Foundry>>Photo>>Enhancement and click on vivid saturation and apply it with default settings.
And the Final Result is
That's it. I hope you found it useful and easy to apply. I you get any problem or you need some help or tutorial related to any topic please comment. Enjoy.
Step 1: Open your Image in Gimp.
Step 2: Now create a new layer and name it "pattern". Then Drag and Drop the Dried Mud Pattern in that layer.
Step 3: Now in the layer window click on the eye icon near the "pattern" layer. This will set the visibility OFF. Now select "Background" layer and use free select tool to select all the skin part as shown in the figure below.
Step 4: In layer window for the "pattern" layer click the eye icon again, making it visible again. Now select "pattern" layer. In canvas window click ctrl+I and then click delete button to delete all the patter area out of the selected area as shown in the figure below(note: if you don't get transparent area after deleting the pattern then plz Go to Layers>>Transparency and click on add alpha then delete the area)
Step 5: In the Layer window there's a drop down list for Modes. In this list select Multiply mode.
Step 5: Now press ctrl+shift+A to remove all the selections. Then choose "pattern" layer and open Colors>>Colorize.
this will open a setting window in which set the bars as shown in the figure below:
Step 6: Now last step go to Fx-Foundry>>Photo>>Enhancement and click on vivid saturation and apply it with default settings.
And the Final Result is
That's it. I hope you found it useful and easy to apply. I you get any problem or you need some help or tutorial related to any topic please comment. Enjoy.
POSTED BY
Unknown
POSTED IN
best gimp tutorial,
best image maipulation,
best photoshop tutorial,
best tutorial,
crack face,
creepy,
g0rg0d,
halloween
DISCUSSION
1 Comment


Me and Blogging is the best site to download the nulled of
E Book Template No1