


Create minimalistic app icons in 10 steps using Gimp.
We require icons at many places in our work. Either for an application or any custom script we need different icons to identify them. So today I'm explaining to you a very easy beginner level tutorial for creating minimalistic beveled icons. Below is the preview of what we'll get after the process:

Nice right??
Resources:
Icon Image from this Font
Gimp 2.6 or better.
Step 1: Create a new image with size 200x200 in gimp. Use "Bucket Fill Tool" from the ToolBox and fill #26807d color in the image.

Step 2: Now create a new layer and name it "IMG".

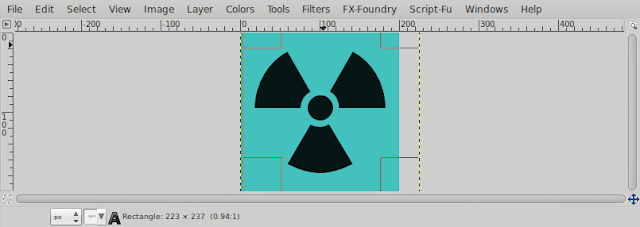
Step 2: Now time to choose the image that you want to impress upon the icon. I'm going to use this radioactive sign from a font named "Devil Inside". Put the image on the IMG layer with black color.
Step 3: Now Right Click on the "IMG" layer and select "Duplicate Layer". This will create an exact copy of "IMG" layer. Name this layer "Bright". Do the exact process again. And Name the new layer as "Dark". (I tell u very soon why we're naming them this way).


Step 4: Now Choose the "IMG" layer and set it's transparency to 70%.

Step 5: Now select the "Bright" layer and Go to Colors>>Colorize. In the setting window fill up the values as shown in the figure below:

Result of this action is as shown in the figure below:

Step 6: Now we need to move the "Bright" Layer a bit to create the bevel effect. Do it something like the figure below using Move Tool.

Step 7: We are now very near to the end. Now Move the IMG layer above the Bright layer and Dark layer below the Bright layer. This will create a unique beveled effect as in the figure below:

Cool eh!
Let's make it more cool...
Step 8: Merge all the layers. Now press Ctrl+i this will select the whole image. Now select the Rectangle Select Tool from the Tool Box and click on the image. This will create a rectangle selection around the image. Now in the settings of Rectangle Select Tool Check the Round Corner Property and set the value to 45. result of this process is as shown in the figure below:

Step 9: Now press Ctrl+i this will select the previously un-selected area. After this press Delete which will leave us with this round cornered image as result.

Step 10: NOw the last touch. In this step I'm going to teach you one bonus tecnique known as "Path Selection". To do this first select the image from outer edges as shown in the figure below:

Now go to Select>>To Path then Go to Select>>From Path. Now go to Edit>>Stroke Path. In the setting window set the values as shown below:

Ensure that the foreground color is black and then press Stroke. This will create a thin black line on the boundary of this image. Now go to Select>>Shrink and shrink the boundary by 1 pixel. After this repeat the last Path selection action with a brighter color to create a bright boundary inside the dark boundary. After this process save the image and our product is ready to launch.

Enjoy and don't forget to leave comments...
Nice right??
Resources:
Icon Image from this Font
Gimp 2.6 or better.
Step 1: Create a new image with size 200x200 in gimp. Use "Bucket Fill Tool" from the ToolBox and fill #26807d color in the image.

Step 2: Now create a new layer and name it "IMG".

Step 2: Now time to choose the image that you want to impress upon the icon. I'm going to use this radioactive sign from a font named "Devil Inside". Put the image on the IMG layer with black color.

Step 3: Now Right Click on the "IMG" layer and select "Duplicate Layer". This will create an exact copy of "IMG" layer. Name this layer "Bright". Do the exact process again. And Name the new layer as "Dark". (I tell u very soon why we're naming them this way).


Step 5: Now select the "Bright" layer and Go to Colors>>Colorize. In the setting window fill up the values as shown in the figure below:
Result of this action is as shown in the figure below:

Step 6: Now we need to move the "Bright" Layer a bit to create the bevel effect. Do it something like the figure below using Move Tool.

Step 7: We are now very near to the end. Now Move the IMG layer above the Bright layer and Dark layer below the Bright layer. This will create a unique beveled effect as in the figure below:

Cool eh!
Let's make it more cool...
Step 8: Merge all the layers. Now press Ctrl+i this will select the whole image. Now select the Rectangle Select Tool from the Tool Box and click on the image. This will create a rectangle selection around the image. Now in the settings of Rectangle Select Tool Check the Round Corner Property and set the value to 45. result of this process is as shown in the figure below:

Step 9: Now press Ctrl+i this will select the previously un-selected area. After this press Delete which will leave us with this round cornered image as result.

Step 10: NOw the last touch. In this step I'm going to teach you one bonus tecnique known as "Path Selection". To do this first select the image from outer edges as shown in the figure below:

Now go to Select>>To Path then Go to Select>>From Path. Now go to Edit>>Stroke Path. In the setting window set the values as shown below:

Ensure that the foreground color is black and then press Stroke. This will create a thin black line on the boundary of this image. Now go to Select>>Shrink and shrink the boundary by 1 pixel. After this repeat the last Path selection action with a brighter color to create a bright boundary inside the dark boundary. After this process save the image and our product is ready to launch.

Enjoy and don't forget to leave comments...


You lost me in Step 2 where you said " Now time to choose the image that you want to impress upon the icon."... You didn't explain how to choose image within a layer - sorry if I am asking an obvious question but I am stuck here, can't find how to do it