How to make Minimal Warrior Type Wallpaper with Daz Studio 4 Renders and Gimp Fx-Foundry
Alright, Let's get started with choosing our Daz studio rendered image. Daz studio is a 3d modelling software. You can get awesome renders from 3d Section of DeviantArt. The Image I'm going to use in my tutorial is rendered by myself and I've uploaded it on my profile in g0rg0d.deviantart.com, you can download it from there also.


Result of above process is as below:


Result of above processing is as below:


Step 1: Now open your Gimp program (I prefer version 2.6 ) and press Ctrl+N. This will open a sub window for setting the size of your new canvas. Insert Width:1920px and Height:1200px and click Ok. A New window with white background will appear. Now click on the Bucket Fill tool in tools pallet or press Shift+B. Then click on the color selection tool and choose #bfa379 color. Bucket Fill the window with this color. Result of this step are in following figure.

Step 2: So we're done with the background color now let's insert the main element 'the warriors image' in the canvas. Drag n Drop the image into the canvas window. The result of this step will be as shown in the following figure.

Step 3: Now time to add some minimalism elements in the canvas. I prefer eastern elements mostly when it comes to minimalism. For this image I'm going to use Chinese cloud brushes. You can download them from here and add to your brush set. Create a new layer with transparent background and place it between the image and background layers. Name this layer as "clouds". Now chose the cloud brush from pallet and apply them on the clouds layer for the result as shown in figure below.

Step 4: Now it's time for effects. But before we proceed lets update your Gimp with some essential plugins and scripts. To do this download Gimp Fx-Foundary from here or download latest Gimp Plugin Registry on Linux from here and Gimp-Gmic from here. This might install all the necessary plugins in you system. If you face any problem then try Google man (help yourself).
Step 5: Hmmm...So we have installed all the required plugins and scripts. Now lets use them. First we are going to use "Cross Processing Effect". You can find this effect in Fx-Foundry>>Photo>>Effects>>Cross Processing Effect as shown in figure below.
Step 5: Hmmm...So we have installed all the required plugins and scripts. Now lets use them. First we are going to use "Cross Processing Effect". You can find this effect in Fx-Foundry>>Photo>>Effects>>Cross Processing Effect as shown in figure below.


Step 6: Next effect we are going to apply is Lomo Effect. Although there are two type of Lomo effects available in Fx-Foundary normal Lomo Effect and Bercovich Lomo Effect. Result of both effect is different, where Lomo Effect result in light effect, Bercovich Lomo provide a heavy and dark result. For this tutorial we are going to use normal Lomo Effect. Go to Fx-Foundry>>Photo>>Effects>>Lomo Effect as shown in following Figure.


Step 7: Now its time for some enhancements. Go to Fx-Foundry>>Photo>>Enhancement>>Vivid Saturation. This effect provide a very effective saturation to the image.

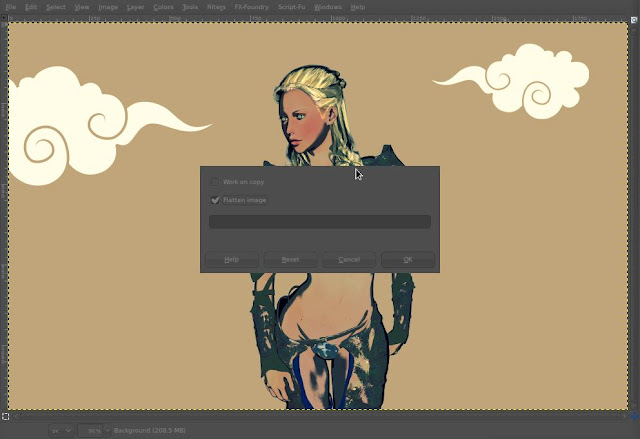
Step 8: One more effect and we're done . Go to Script-Fu>>Photo>>Fix-Overblown as shown in figure below...

Step 9: So our product is finally ready to go. Following is the final result of whole process. There are some more Effects which I found really wonderful to apply on this image..
1: Filters>>Artistic>>Cyanotype
2: Filters>>Artistic>>Movie 300
3: Script-Fu>>Photo>>BW from Graphic
Alright, We are done with editing the image. You can add more elements to your image according to your preference. Or can use the same process with any other image or render you like. Just remember to keep the background color as light as possible.....
I hope I've made every necessary step available to you. Still I you need any help related to steps please comment or write to me on deviantgaur@gmail.com.
Thanks...[*_*]