


How to create a futuristic hero with Gimp.
I am a great fan of sci-fi themed art. The way these artworks represent the future generate a massive curiosity in our mind about "how the thing are going to be in the future". This curiosity inspired me to produce sci-fi artwork using my imagination. And the first things that hot my mind were Superheroes, world war, aliens etc. When I tried to combine these things they were all directing to a single and awesome option HALO. HALO was the game I was recently playing. So I set my mind to create a HALO artwork with a futuristic twist in it, And you are going to do that with me too. So let's make our World War 3 artwork with HALO.


interesting right??
Ok then lets gather the resources that will be required during the process.
Resources:
- HALO Image
- Background City
- Clouds
- Splash Brushes
- smoke and cloud brushes 1 and Smoke and clouds 2
- Rain Brushes
- Fx-foundry, Gimp Plugin Registry, G'Mic
After gathering all the resources installing brushes lets start with our artwork.
Step 1: Open the HALO image in Gimp.To give this image a grimy look we'll have to change the sky and clouds. So Choose Fuzzy select tool from tool pallet and select area containing sky in picture and delete that are cleanly until you have all the sky part removed completely.
NOTE: For newbies Go to Layers>>Transparency>>Add alpha channel and click on it to get transparent background after removing the area from image.

After removing all the clouds the view should be something like this.

Step 2: Now we can see that on the street these is some bright part . As we are trying to create a night seen and moonlight can not make this bright effect we need to cover it with relative shadow.

Create a new layer and name it "street-shadow". Select the region like i've done in the image above then go to "street-shadow" layer and fill the selected region with black color. now set the transparency of this layer between 63-70% according to your preference. I should just blend in with original shadow.

You can see that shadow now looks like the part of original image.
Step 3: How could it be possible that in a war scene there's no sign of war like broken building, fire, smoke etc. So in this step we will create a broken building effect. Let's take the nearest building on right side consider that a canon blasted this building's front part badly. How are we going to do that??
Here's the way--
- Use a grunge brush set the color to black and apply the brush on the front corner of the image in such way that it seem like the corner area is blasted.

- This alone does not seem right. Make some more buildings affected like this in background also. Now make the border of this hole in the building. Select the same grunge brush and set the color to #878781 and create corner of every or broken part like the image below to make it look a bit realistic.

- Create some more broken buildings and boles like this. Now time or the smoke coming out of the blasted buildings. For his we will be using the smoke brushes. Create a new layer "smoke". Apply the smoke brushes on different places where you've created blasted areas like in the figure below.Remember one thing that everything should be done on different layers.

Step 4: Now let's add sky in out picture. Create anew layer below this building layer and name it "sky". Now open the "clouds" picture in gimp and convert it to grey-scale and save. Then drag and drop that image in our main window below the background layer(otherwise the buildings will be overlapped) . After doing that you can automatically observe the filling of gap by that image. Scale and transform the "sky" layer to produce the result like in the figure below:

Looks good right but there is a problem. The sky still is a bit bright then we require for night scene so we will make it a little darker. To do this create a new layer "darker". Fill the layer with black color and then set the transparency of the layer to 20-30% and then put it above the "sky" layer. The result of this step will be like in the figure below.

Now it's okay. Let's move to next step.
Step 5: Now it's time to bring the hero in focus. Drag and drop the Halo image in the main window and name the layer "hero". Re-size the image to produce the result as shown in the figure below.

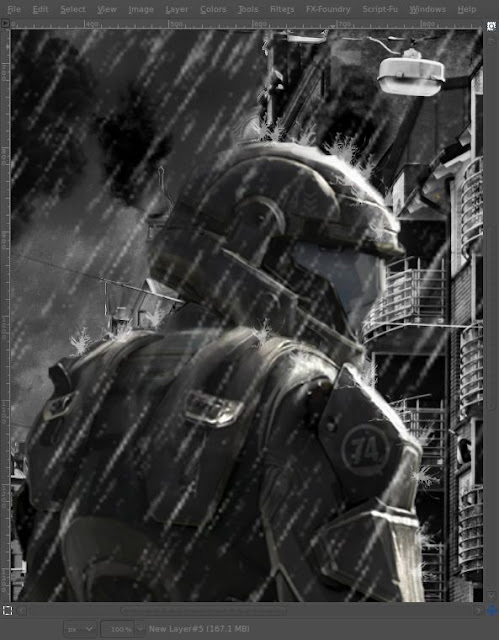
Step 6: Now let's add some rain to the scene to make it look like more heroic and tense. Create a new layer "rain". Chose the rain brush anyone you like from the set and resize it to the size of image and Apply. Image after the rain will look like this.

Step 7: Now as the hero is standing in rain and raindrops are collapsing on the Armour, splashes are a compulsion to make the scene more realistic. To do this create a new layer "splash". Chose splash brush and set the color to white then apply the a brush on every part of the image you think is facing the rain directly. This will look something like this.

you can use other splatter brushes along with the splash brushes to produce some different effects.
Step 8: We're nearly done one final effect and our product is complete. First of all flatten the image. To do this save the image in png format. Open that saved image with gimp. Then open Fx-foundry>>Photo>>Effects>>Cross processing Effect. In setting window of this effect chose flatten
image and then click apply.


This will complete out product and we will have the final result like this below.
Note: I've created this tutorial keeping a intermediate in mind but if you have any problem please comment once or mail and I will surely help you. Enjot [*_*]


this is awesome tutorial...thanks mate. Please keep it up :)
you guys are awesome!
you guys are so good at this. Keep it up Nightboy97 from http://www.beststuffisfree.blogspot.com
i mean www.beststuffisfree.blogspot.com
Thanks a ton!!! Its awesome.....!
unfortunatly the website to download the city scape will not send a verification email